Mushroom & Potato Hash with Poached Eggs and Hollandaise

There’s not too many things I love more than Sunday breakfast. I just got back from a long trip in Puerto Rico, and before I left I was trying to use up everything in my fridge! I ended up making this on a whim and it was super delicious. The potatoes were crisp and mushrooms added a nice texture. And the egg with the hollandaise brought it alllll together. Sometimes the best meals are made with the random ingredients you have in the fridge!

Ingredients: (serves 1)
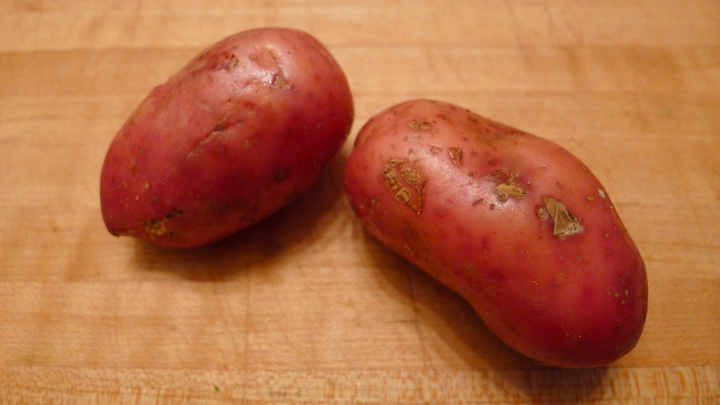
6 baby potatoes, cubed into smaller pieces
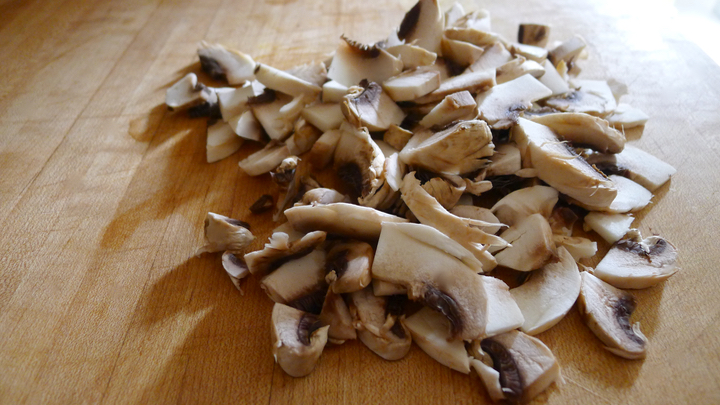
4 white mushrooms, sliced
1/2 shallot, chopped
1 green onion, chopped
1/4 teaspoon smoked paprika
Salt and pepper, to taste
1 egg

Hollandaise:
2 egg yolks
1/2 teaspoon lemon juice
1/2 stick unsalted butter, melted
Salt and pepper, to taste
Pinch of cayenne pepper

Boil the potatoes until slightly fork tender but still a little firm. You don’t want to overcook them or they’ll break up when you sauté them in the pan. Remove and set aside. In a small pan, sauté the shallot in some olive oil until softened, about 2 mins. Add the potatoes, paprika, salt and pepper. Cook for about 5 minutes, then toss in the mushrooms and green onion and continue cooking for another 5 mins – or until the potatoes are golden brown and the mushrooms are softened.

While the hash is a cookin’ start making the hollandaise. Add about two cups of water to a pot and bring to a simmer over low heat. Melt the butter in the microwave and set aside. In a metal mixing bowl, add the egg yolks and lemon juice then whisking vigorously until it thickens and almost doubles in size. Next, place the metal bowl on top of the pot with the simmering water and turn off the heat. Immediately start whisking very fast, slowly pouring in a tablespoon or so of the melted butter. Whisk vigorously the entire time! Add a little more butter and repeat until all the butter is added. Make sure to do just a little butter at a time. Set aside and whisk in a little black pepper, cayenne, and a sprinkle of lemon juice.

To poach the egg, boil some water in a medium sized pot. Add about a teaspoon of apple cider vinegar (will help make it fluffy) and gently pour in the egg. Cook for about 30-60 seconds before removing with a slotted spoon. I usually lift my egg slightly out of the pot and gently poke the centers until it feels a little firm but runny in the center.

To assemble, plate the hash and top with the egg and hollandaise sauce! I had some asparagus around as well, so I shaved that and quickly blanched it for about 30 seconds in the hot water then sprinkled with rice wine vinegar and a crack of pepper to eat on the side.

Veggie Sushi with Cauliflower “Rice”

img_1646As much as I wanted to just cry tears into a bowl of carb-filled pasta the night after the election, I decided a healthy dinner might make me feel better. So, I made some vegetable sushi! I got cauliflower in my CSA this week, and decided to use that as the “rice” this time. It’s not as sticky as rice, but holds up pretty well. I filled it with a few veggies I had on hand, and used my Bragg’s liquid aminos instead of soy sauce – it tastes exactly the same but is a healthier alternative!

Ingredients:
1 small head of cauliflower, cut into chunks
1 tablespoon rice wine vinegar
2 medium carrots, but into matchsticks
1 mango, cut into matchsticks
1 cucumber, cut into matchsticks
3-4 nori sheets

Start by making the cauliflower rice by processing the cauliflower and rice vinegar until it resembles the texture of rice. Set aside. I saw a few recipes where they steam the cauliflower first before processing it and letting it cool, which might make it stickier, but I went the lazy route and skipped the steaming… worked out fine! Next, place a nori sheet on your sushi mat and spread a layer of the cauliflower reaching close to the edges, but leaving one of the short edges with about an inch free (see photo) Next, starting at the bottom, layer a row of vegetables. You don’t want to over fill it because when you wrap it up it’ll be difficult, but you also don’t want to under fill it because you want to taste the fillings!

Now, time to get your roll on. Start with the end closest to you and lift the edge of the nori over the veggies and tuck it under. Using the sushi mat, press it over the roll to help tighten it, then continue rolling with the help of the mat, pressing and tucking as you go until it’s all rolled up. Use a dab of water to help seal the roll shut at the end.

Using a clean and very sharp knife, hold the roll tightly and cut the roll into pieces. Top with pickled ginger, wasabi, soy sauce or liquid aminos… whatever your little heart desires. Enjoy!

p1130546

Kale Potato & Beet Galette With Feta Cheese

I was planning on a making a pizza with some leftover pizza dough I recently froze (or so I though) but when I took it out of the freezer, I realized it was leftover dough from the last galette I made! Whoops. I ended up just making a galette instead, but it was just as delicious! I’ll have to start labeling the things in my freezer from now on though…

Ingredients:

Dough:
1 cup all-purpose flour
1/2 teaspoon salt
1 tablespoon sugar
6 tablespoons cold unsalted butter, cut into small cubes
1 large egg, beaten

Filling:
2 cups kale, roughly chopped
1/2 shallot, chopped
1 garlic clove
2-3 fingerling potatoes, thinly sliced
2 small golden beets, thinly sliced
Salt and pepper, to taste
1 cup crumbled feta cheese

Start by making the dough as it will need some time to chill in the fridge. Whisk together the flour, sugar, and salt. Cut in the butter with a pastry cutter, or use your hands. If using your hands, you simply want to roll the butter chunks between your fingers with the flour until it resembles the texture of small peas. Pour in the egg and mix until incorporated. Pour out onto a flat surface and shape into a disk, then wrap in plastic wrap and place in the fridge for at least an hour.

When the dough is almost ready preheat oven to 375 degrees.

Start cooking the other ingredients. Saute the beets and potato slices in olive oil until fork tender, set aside. Next saute the garlic and shallots in olive oil until softened, then add the chopped kale and cook until wilted, about 3-4 mins. Salt and pepper to taste.

Roll out the rough on a lightly floured surface until you have a full circle. Add 1/2 of the feta cheese on the bottom of the dough, leaving a 2-inch border. Top with half the kale and shallots, followed by the beets and potatoes, then the rest of the kale. Top with remaining feta cheese, then fold the edges of the dough over the filling, and brush the edges with the egg wash.

Place in the oven and cook for 30 mins or until the dough is golden brown. Enjoy!

p1130471

Save

Save

Potato & Onion Stacks with Feta and Greens

I was trying to figure out what to make for dinner while simultaneously catching up with my mom over the phone, and she came up with this yummy recipe within moments of me listing what I had on hand. She’s always been able to whip up something delicious with whatever she has! It turned out really great and was a super comforting meal on a cool fall night. Thanks ma!

This could be a great side for Thanksgiving coming up as well. Just adjust the recipe as needed to fill as many muffin cups as you need!

Ingredients: (makes 2)
1 large red potato, cut into thinly sliced rounds
1 small onion, cut into thinly sliced rounds
2 tablespoons chopped fresh parsley
1/2 teaspoon smoked paprika
2 cups chopped mustard greens (or kale)
1 large garlic clove, minced
1 cup crumbled feta cheese (Parmesan would be great alt too)
Olive oil
Salt and pepper

You can either make these in muffin cups, or you can use an oven safe bottomless mold like I did. Make sure your potato slices are thin enough so they cook through. Use a mandoline slicer if you have one! I plan to make my potatoes a little thinner next time.

Preheat oven to 375 degrees

In a large bowl toss together the sliced potato with olive oil, salt, pepper, paprika, and parsley. Next, in a medium pan sauté the garlic in a little olive oil for about a minute, then add the mustard greens and cook through until wilted. Spray the muffin tins or molds with non-stick spray or a brush of olive oil, and begin to layer everything. Start with pressing in about 3 potato slices, then add an onion round, 3 more potato slices, mustard greens, 3 more potatoes, feta cheese…. and so on until you’ve reached the rim. Repeat process in 2nd mold. Place in oven for 45-50 minutes or until the potato is golden brown and crispy around the edges. You can pierce the potato with a knife to check that it is cooked through.

Remove from oven and let cool for a few minutes. Using a knife go around the edges to loosen the potato from the mold. Place on a plate, and gently pull the mold up to reveal the potato. If using a muffin pan, use the fork to gently lift the potato out of the pan. Ta-da! I ate mine with a side salad, perfect little dinner.

Save

Eggplant Rollatini With Kale

Roasted eggplant filled with cheese… what else do you even need in life! This recipe is so easy to make and absolutely delicious. It was the first time I made it and I will definitely be making it again! Totally worth turning my oven on in the hot weather yesterday…

Ingredients:
1 eggplant, cut into ¼ inch slices (the long way)
2 cups ricotta cheese
1 cup shredded mozzarella cheese, plus more for topping
½ cup shredded Parmesan cheese
2 cups chopped kale
½ cup chopped yellow onion
1 large garlic clove, minced
Good pinch red pepper flakes
2 cups tomato sauce (I used tomato basil)
Olive Oil
Salt and pepper, to taste

Preheat oven to 350 degrees. Place the sliced eggplant on a baking sheet (you may need two) and brush both sides with olive oil. Bake in oven for about 10 minutes or until soft. Remove from oven and let cool.

While the eggplant is roasting/cooling make the filling. Saute the garlic, onion, kale, and red pepper flakes in some olive oil for about 5 minutes. Salt and pepper to taste. In a large bowl mix together the ricotta, mozzarella, and Parmesan. Add the kale mixture and stir together.

When the eggplant is cool enough to handle, add a good dollop of the ricotta mixture to one end, and gently roll up each eggplant piece. Pour enough tomato sauce onto the bottom of a baking dish to cover it, then add the rolled eggplants, fitting them closely together. Top with more tomato sauce and additional mozzarella cheese. Cover with foil and bake for 30-40 minutes. Try to not let the foil touch the cheese though otherwise when you remove the foil, it’ll take the cheese with it (as I unfortunately learned.) Remove foil and let bake for another 5-10 minutes or until the cheese is slightly golden.

Let cool for a few minutes before serving. Enjoy with maybe a side salad and/or crunchy bread!

Summer Corn With Basil & Garlic Aioli

I’ve always loved Elote, aka Mexican street corn. It is smothered in a messy mix of ingredients that tastes exactly how I would imagine the corn in Heaven to taste. Traditionally it is rolled in butter and mayonnaise, then crumbled cotija cheese, chili powder, and a squeeze of lime. I decided to make my own little version of it this morning by making an aioli with the basil and garlic I had from my CSA bag this week, plus Parmesan cheese and paprika. It was amazing. AMAZING. I made it early this morning with the intention of bringing it as part of my lunch to work today, but after tasting a little bite, I ate the whole thing (at 9AM) standing over the sink in my kitchen as to not make a mess. WORTH IT.

Ingredients: (serves 5)
5 corn on the cob
1/4 cup fresh basil
2 tablespoons olive oil
1/3 cup mayonnaise
1 tablespoon lemon juice
1 garlic clove
Black pepper, to taste
2 tablespoons grated Parmesan cheese, plus for for topping
Smoked paprika, for topping

In a food processor, or with an immersion blender, mix together the basil, olive oil, mayo, lemon juice, garlic, pepper, and Parmesan cheese until smooth. You can keep the corn whole or cut them in half, whichever you prefer. Brush the corn with olive oil and cook in a pan over medium heat, turning every minute or so to cook the sides evenly, about 7 minutes total. You can also cook the corn on the grill of course, I just don’t have a backyard here in NY and think it’s prooobably illegal to put a grill on my fire escape! To serve, brush the corn with the aioli then top with grated parmesan cheese and paprika. Eat with lots of napkins!

Save

Summer Corn Leek & Tomato Galette

I make a variation of this galette a lot in the summer, as it is one of my favorite flavor combinations – fresh summer corn and tomatoes! I posted a version of it last summer using dandelion greens, which you can find here. I like to add corn meal to the crust because it gives it a nice texture and flavor, and I usually make a double batch of the dough so I can freeze half and make a galette on demand another night! Goat cheese is what I usually add on top, though I’m sure feta would be delicious ….or maybe even some torn burrata when it comes out of the oven?! Man I wish I thought of that earlier, that will definitely be an experiment for next time.

Galette Crust: (this crust is for 2 medium galettes, as I like to freeze half for future use)
1 1/4 cups all-purpose flour
1/4 cup corn meal
1/4 teaspoon salt
8 tablespoons cold unsalted butter, chopped into cubes
1/4 cup plain yogurt
2 teaspoons lemon juice
1/4 cup ice water
1 egg, for brushing
1/2 teaspoon fresh black pepper

Filling: (this filling is for 1 galette)
2 ears of corn, cut off the cob
1/2 shallot, chopped
1 leek, sliced
2 garlic clove, roasted whole
2 small heirloom tomatoes, sliced
4 oz garlic & herb goat cheese (can usually find at grocery store)
Salt and pepper, to taste
Fresh torn basil for topping

Start by making the galette crust. In a large bowl, mix together the flour, corn meal, salt, and pepper. Cut in the butter with a pastry cutter, or use your hands. If using your hands, you simply want to roll the butter chunks between your fingers with the flour until it resembles the texture of small peas. In a separate small bowl, stir together the yogurt, lemon juice, and water. Add this to the flour/butter mixture and mix with your fingers until a dough forms. Shape into two disk (if you plan to save/freeze half like I did) then wrap in plastic wrap, and place in the fridge for at least an hour.

When the dough is almost done vacationing in the fridge, start getting the fillings ready. Preheat the oven to 400 degrees, wrap the garlic cloves in aluminum foil and roast in the oven until soft, about 15 minutes. Next, sauté the corn for about 5 minutes with some olive oil, salt, and pepper. Don’t overcook it though because it will continue to cook later in the oven and you don’t want it to get chewy. Set aside. Add the leeks and chopped shallot to the pan and sauté until softened, about 5 minutes.

To assemble, roll the dough out on a floured surface. I like to do this on a sheet of parchment paper so that I can lift it right onto the baking sheet after. It is OK if it’s not a perfect circle, I say the more rustic it looks the better! Leaving about an inch boarder around the edges, spread on the corn, then sprinkle around the roasted garlic chunks, followed by the leeks/shallots, the sliced tomatoes, then the goat cheese crumbles. Fold in the edges, then place the galette (with the parchment) on a baking sheet. Cook in oven for 30-45 minutes, or until the crust is golden and the filling looks happy. It won’t smile at you, but you’ll know it’s happy.

Let cool for 5 minutes, throw on some fresh torn basil, then dig in!

Save

Save

Peach & Plum Caprese With Balsamic Glaze

A traditional caprese with tomato and mozzarella is great and all, but why not switch it up a little! I made this one with plums, peaches, and a balsamic glaze. You can find balsamic glaze at any major grocery store, or you can make it yourself using balsamic vinegar and sugar! I didn’t have enough vinegar to make my own batch this time, so opted for store-bought. But here is the usual recipe I follow when making my own!

Ingredients:
2 plums, cut into half slices
2 peaches, cut into half slices
8 oz mozzarella cheese, cut into half slices
Fresh basil leaves, kept whole
Balsamic glaze
Salt and pepper, to taste

Simply arrange the slices one by one – peach, basil, mozzarella, plum… and so on. Drizzle with the balsamic glaze, then a pinch of salt and fresh cracked pepper.

Save

Save

Simple Summer Veggie Bowl

In the summer I crave fresh meals a lot – crisp veggies, fresh herbs, all the good stuff. In the winter on the other hand, I crave anything hot and filled with carbs and melted cheese. I figure it must all balance out between seasons, right?! Anyway, here is one of go-to summer dinners. Packed with vegetables, soft boiled eggs, crispy polenta, and yummy cucumber yogurt to tie it all together.

Ingredients:
1 Persian cucumber, chopped
1 cup Greek yogurt
String beans, blanched
1 cup cauliflower, cut into smaller pieces
1/2 teaspoon ground turmeric
Cherry tomatoes
1/2 ripe avocado
Sriracha
1 egg
Pre-cooked polenta, sliced
Olive oil
Fresh Lemon
Black pepper
Maldon (flake) salt

Preheat oven to 350 degrees. On a baking sheet, toss the cauliflower in turmeric and olive oil. Also add the tomatoes. Roast for about 20 minutes or until tomatoes softened and burst, and cauliflower is roasted well.

In the meantime blanch the string beans in salted boiling water for 2 minute, then placing in a bowl of ice water to stop the cooking process. I used the same water to boil my egg – bring back to a boil and gently add your egg, let cook for 5 minutes (6 min max) then also place in the ice water.

Next, add a little olive oil to a pan and cook the polenta slices until crisp, about 3 minutes each side. Also sauté the kale with some olive oil for at about 5 minutes. Lastly, mix together the cucumber and Greek yogurt.

To assemble, just place everything in a bowl… and as my grandmother always says – “chow baby!”

Caramelized Onion & Cauliflower Quiche

I always forget how incredibly easy it is to make a quiche! Plus it’s a great way to use up any leftover veggies and cheeses you have around. So, when on Saturday night I remembered that I had a frozen pie crust from Whole Foods, and a excess amount of eggs, I knew that quiche was my dinner destiny. (I just re-read that sentence and am now realizing I might not be the coolest 29 year old out there haha) Anyway! I’ve never put cauliflower in quiche before but I actually liked it a lot! I think a creamy goat cheese would be great with this as well if you want to swap the Parmesan cheese for something else…

Ingredients:
1 pie crust, frozen or homemade
1 small cauliflower head, chopped and steamed (about 1 cup)
1 large garlic clove, roasted
1/2 large red onion, thinly sliced
1/2 cup shredded Parmesan cheese
5-6 eggs, beaten
1/3 cup half & half, or cream
Good pinch red pepper flakes
Salt and pepper, to taste

Preheat oven to 350 degrees, and cook the pie crust for about 10-15 minutes or until slightly golden. If you have them, you’ll want to use pie weights so that it doesn’t puff up. Or if you’re like me and keep meaning to buy pie weights but always forget to, then you can just prick holes in the bottom of the pie to let the heat escape, and simply push down any dough that puffs up. In the meantime, also roast the garlic in the oven. I just wrap mine in some aluminum foil and place it in there for about 15-20 mins. While those are cooking, saute the red onion with some olive oil until soft and caramelized, about 10 minutes. Add the red pepper flakes toward the end. In a large bowl beat the eggs and add the cream, salt and pepper.

Spread the caramelized onions and chunks of roasted garlic on the bottom of the pie shell, next add the cauliflower, then the Parmesan cheese. Lastly, pour over the eggs. Bake for 25-30 mins or until the eggs are set and the crust is golden brown.